Using Univention Active Directory Over the Internet
MIGRATED FROM OLD DOCS PLATFORM
This guide will show you how to securely and safely use an Active Directory solution based on Univention Corporate Server over the internet with a VPN.
Important Notes
Please familiarize yourself with Microsoft Active Directory, Samba AD, LDAP, and Linux (specifically Debian) before attempting to follow this guide. MS AD in particular is a very complex piece of software.
We will assume you already picked some servers to run the Active Directory cluster.
It is highly insecure to run Active Directory exposed to the internet! ALWAYS use a VPN.
1. Initial Server Setup
- Install Univention through the ISO / one of the VM images.
- Do not complete the domain join wizard after installation is finished, instead, reboot the server and SSH into it.
- Install, set up, and test the VPN software of your choice. I use ZeroTier but solutions like OpenVPN and WireGuard work too. Make sure all of the DCs are in this network and can ping each other.
- Open the server's public IP in your browser and begin the domain join wizard. If you don't have a UCS domain already, you can create one (as the primary DC), but if you already have one, you should set your DNS servers to the private IPs of the existing DCs but do not check the box allowing the computer to join the domain immediately (we will do this manually later).
- If DNS doesn't work, make sure the other DCs are listening on port 53, and also add your IP to
dns/allow/query/cachein the UCR. - Install any software needed through the App Center.
- Reboot the server
2. Main Guide
Note: This guide is mostly geared towards new backup DCs, not a primary DC.
- After rebooting, log into the Univention web UI using
rootand your root password. (Administrator won't work as you aren't domain joined yet). - (Optional) Add an A record on your domain to point to the new DC and issue a certificate using the Let's Encrypt soft\ware from the App Center.
- Join the machine and tweak the DNS as needed.
- This is what the DNS settings of every DC should look like (in System > Network) - click to enlarge:

- Using another DC, open Domain > DNS and create a new reverse lookup zone with the subnet of your internal IPs (in forward notation, i.e. 172.24 instead of 172.24.0.0/16) and nameservers set to the hostnames of every DC in the cluster.
- Add the internal IPs to its pertaining domain controller in Devices > Computers > Network settings. The public IP there must be removed.
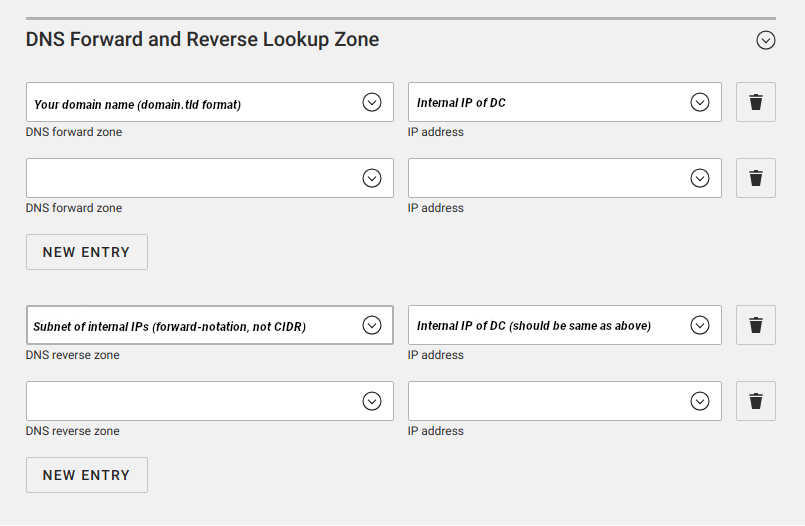
- Scroll down to DNS Forward and Reverse Lookup Zone, and remove all forward/reverse records except for ones that point to the DC's internal IP. Final results should look like this:
- Open Domain > DNS again. Delete all reverse lookup zones that are not for your interna IP range. Also check to make sure that none of the entries in the forward zone mention any public IPs. (If they do, remove them and double check that you followed the steps above!).
- Everything should work now :)
Optional
- For additional security, you can ensure SSH and Samba (LDAP/etc) are not listening on the public IP. To do this, set the UCR variables like this:
samba/interfaces/bindonly: yes
samba/interfaces: lo {your VPN interface}
ssh/ListenAddress: {your VPN interface IP} <- This won't work for VPN protocols where the service starts before SSH!